The Ultimate Moon Sand Recipe: Soft, Moldable, and Fun for Kids
Looking for a hands-on activity that’s affordable, safe, and endlessly fun? This moon sand recipe is a perfect pick. With just two common household ingredients, you can create a sensory play experience that’s not only moldable and soft but also suitable for young children. Whether you’re setting up an indoor sandbox or planning a sensory bin for preschool activities, this recipe offers creativity, simplicity, and joy.
The beauty of moon sand lies in its ability to mimic beach sand while being dry and mess-free. Plus, you can modify the base ingredients for taste-safe or scented versions, depending on your needs. This article will guide you through everything—from tools and preparation to mixing tips and variations.
Overview of Moon Sand Recipe
The moon sand recipe is essentially a homemade version of kinetic sand. It uses a combination of flour and oil to produce a moldable texture that kids can shape and crumble over and over again. This DIY version is:
- Non-toxic and safe for kids
- Budget-friendly with ingredients already in your kitchen
- Customizable for color and texture
- Easy to store and reuse
Ideal for children aged 2 and up, this sand-like dough helps improve fine motor skills, encourages imaginative play, and offers a calming, sensory-rich experience.
Brief History and Cultural Significance
While the term moon sand might sound modern, the idea of moldable sensory material has been around for decades. It gained widespread popularity through educational and therapeutic communities due to its sensory benefits.
The name moon sand comes from its soft, dry, and powdery texture that somewhat resembles the surface of the moon. It’s now a popular choice in early childhood classrooms, occupational therapy sessions, and homeschool environments for its tactile feedback and creative potential.
Homemade versions like this moon sand recipe became especially trendy thanks to online parenting blogs and social media, where easy DIY ideas for children’s activities thrive.
Essential Tools and Equipment
Before you begin, gather the following:
- Large mixing bowl – Roomy enough for thorough mixing
- Wooden spoon – Ideal for starting the mixing process
- Measuring cups – To get accurate proportions
- Airtight container or Ziploc bag – For storing the sand
- Optional items:
- Scoops or beach toys
- Cookie cutters or silicone molds
- Play trays to contain the mess
Each item has a specific purpose, contributing to a clean and effective mixing process. While the base moon sand recipe is simple, the right tools can enhance both the preparation and the play.
Importance of Each Tool
- The mixing bowl allows the ingredients to be combined without spilling.
- A wooden spoon is sturdy enough for initial mixing, which can be surprisingly dense.
- Measuring cups ensure the flour-to-oil ratio is just right.
- An airtight container or Ziploc bag keeps the sand soft and moldable for weeks.
- Play molds add variety to the experience and can spark creativity in kids.
Optional tools like scoops and cookie cutters can turn playtime into themed activities, helping children build castles, cupcakes, or even letters and numbers.
Preparation Tips
Get the most out of your moon sand recipe with these expert tips:
- Use dry, fresh flour – Moist flour can affect the sand’s shelf life and feel.
- Mix thoroughly – Spend time mixing to ensure the oil fully integrates.
- Finish by hand – After the spoon has done its job, knead the mixture to perfect the texture.
- Color smartly – If you want colored sand, add food coloring to the oil before mixing for even distribution.
- Choose the right oil – Baby oil gives the smoothest feel, but coconut or vegetable oil is better for younger kids who might taste it.
- Keep it clean – Store in a sealed container when not in use. Discard if it becomes dirty or smells off.
Ingredients List
Here’s what you need for the basic moon sand recipe:
- 8 cups all-purpose flour
- 1 cup baby oil
(Optional substitutions: vegetable oil, coconut oil, canola oil)
For edible-friendly moon sand: Use cooking oils like coconut or canola oil instead of baby oil.
For vibrant colors:
Add gel or powdered food coloring to the oil before mixing.
Powdered tempera paint (1 tbsp) can be added post-mix for even stronger colors.
Avoid water-based food coloring for even texture.
Step-by-Step Instructions
1. Add Dry & Wet Ingredients
- Pour 8 cups of all-purpose flour into a large mixing bowl.
- Add 1 cup of baby oil (or substitute oil) directly on top.
2. Mix It Up
- Use a wooden spoon to stir the ingredients together for about 5 minutes.
- As the mixture starts clumping together, switch to using your hands.
- Knead the mixture to make sure the oil evenly coats all the flour.
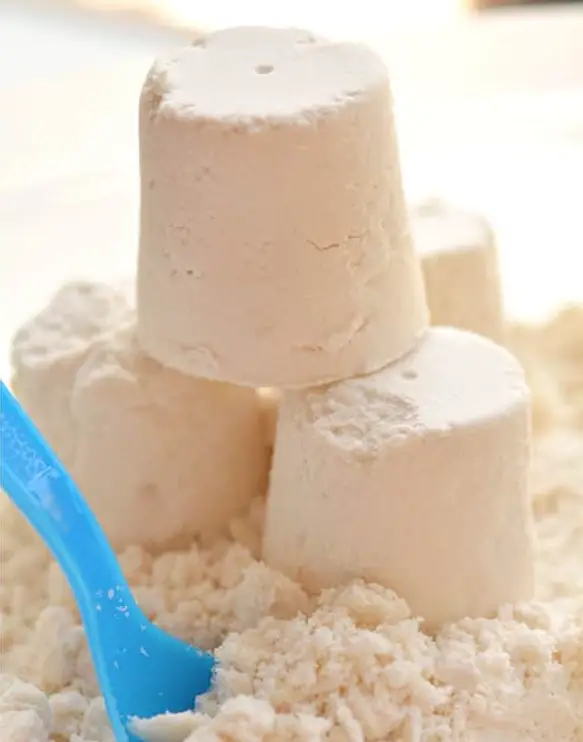
3. Play Time!
- Your moon sand is ready when it holds its shape when squeezed but crumbles easily when pulled apart.
- Let kids explore with molds, scoops, or just their hands.
This DIY activity is easy to clean up, and you can refresh the batch any time. The moon sand recipe offers a great way for kids to engage their senses while being creative.
Tips & Variations
Molding:
- The moon sand holds its shape like wet beach sand, perfect for sandcastles or pressing into molds.
Coloring:
- Add coloring to the oil before combining with flour for even distribution.
- Powdered food color or tempera paint are excellent choices.
Oil Choices:
- Baby oil offers a clean and silky texture.
- Vegetable or coconut oil is ideal for toddlers who may put it in their mouths.
Storage:
- Keep moon sand in an airtight container.
- It lasts from 2 weeks to a month if kept dry and clean.
- If it smells off or becomes clumpy, discard and make a new batch.
Pair It, Understand It, Perfect It — Deep Dive into the Moon Sand Recipe
Side Dish Recommendations (Creative Play Pairings)
While the moon sand recipe isn’t something you eat, pairing it with other sensory activities can enhance the experience and create an enriching, themed play session. These “side dish” ideas are other crafts, games, or DIY projects that complement moon sand sessions, especially in home school or early childhood settings.
Here are 8 fun side “dishes” to serve alongside your moon sand recipe:
1. DIY Slime Station
- Offer your child another tactile material.
- Great for older kids who want stretchy fun.
2. Colored Rice Sensory Bin
- Add rainbow-dyed rice to a separate bin.
- Encourages contrast in texture play.
3. Water Beads Exploration
- These squishy beads pair well with the dry texture of moon sand.
- Use them in adjacent trays for variety.
4. Scented Playdough
- While moon sand is soft and dry, playdough gives a firmer grip.
- Add essential oils for a calming scent experience.
5. Bubble Foam Bin
- Create fluffy bubbles using soap and water.
- It gives a wet tactile counterpart to dry moon sand.
6. Nature-Inspired Treasure Hunt
- Hide small natural objects like leaves or pebbles in the moon sand.
- It becomes an exciting excavation game.
7. Theme Day Kits
- Pair moon sand with printed space-themed cutouts.
- Use black and silver glitter to match the “moon” concept.
8. Ice Play Sensory Table
- Freeze small toys in ice cubes and let kids break them out with moon sand tools.
- Combines cold/wet with dry/gritty for multi-sensory fun.
Common Mistakes to Avoid & How to Perfect the Moon Sand Recipe
Avoiding these mistakes ensures your moon sand recipe turns out soft, moldable, and long-lasting:
Mistake 1: Wrong Flour-to-Oil Ratio
- Problem: Too much oil makes it greasy and sticky.
- Fix: Stick with 8:1 ratio (8 cups flour to 1 cup oil).
Mistake 2: Overmixing or Undermixing
- Problem: Undermixing leaves dry pockets; overmixing may break the structure.
- Fix: Stir thoroughly, then knead gently.
Mistake 3: Using Water-Based Food Coloring
- Problem: It doesn’t mix well with oil and can cause clumping.
- Fix: Use powdered or gel-based food coloring.
Mistake 4: Incorrect Storage
- Problem: Air exposure dries it out or leads to contamination.
- Fix: Store in airtight containers and check weekly.
Mistake 5: Using Oils With Strong Odors
- Problem: Oils like olive oil can create unpleasant smells.
- Fix: Stick to odorless oils like baby oil or light vegetable oils.
Mistake 6: Letting Kids Play with Dirty Hands
- Problem: Dirt, food, or saliva can cause early spoilage.
- Fix: Always wash hands before play and monitor closely.
Mistake 7: Not Testing Texture Before Use
- Problem: You may end up with a mix that doesn’t mold well.
- Fix: Always squeeze a handful before giving it to kids. It should hold shape but crumble when pressed apart.
Why Texture Matters
The perfect texture in your moon sand recipe means:
- Moldability like damp beach sand
- Crumble on touch to reset
- Soft and smooth between fingers
- No greasy residue left behind
If you’re struggling to achieve that, revisit your ratio and kneading time.
Tips, Notes, FAQs, and Final Thoughts on the Moon Sand Recipe
Expert Tips to Make the Most of Your Moon Sand Recipe
Perfecting your moon sand recipe is all about tweaking small details. These advanced tips will help you extend its lifespan, improve texture, and adapt it to different ages.
Best Practices:
- Use a sieve to fluff your flour before mixing. This avoids clumps and creates an even smoother texture.
- Store in layers: Press your moon sand tightly into your container to reduce air contact.
- Label containers if you’re making multiple colors or textures.
- Add glitter for magical space-themed sand that sparkles.
- Create scent themes: Use a few drops of lavender oil (if safe for your child) for calming play.
Notes for Parents & Caregivers
Safety First:
- Not for consumption, even if made with edible oil.
- Always supervise toddlers.
- Discard the moon sand if it gets contaminated or begins to smell sour.
Reusability:
- If the sand starts to dry out, add 1–2 tsp of oil and knead it back to life.
- For ongoing classroom use, refresh the batch weekly.
Storing and Reusing Moon Sand Recipe
Storage Tips:
- Store in an airtight plastic container or heavy-duty Ziploc bag.
- Keep in a cool, dry place—humidity affects texture.
- For added freshness, drop a piece of dry paper towel in the container to absorb moisture.
Shelf Life:
- Clean use: up to 4 weeks
- Everyday play: about 2 weeks
- If odor, mold, or changes in consistency occur, discard immediately.
FAQs – People Also Ask About Moon Sand Recipe
1. Can you eat moon sand?
While this moon sand recipe uses edible-safe ingredients like flour and vegetable oil, it’s not intended for eating. Always supervise children during play.
2. How long does moon sand last?
If stored properly in a sealed container, it lasts 2 to 4 weeks. Keep it clean and dry for best results.
3. Is moon sand messy?
Not very. It’s less messy than traditional sand and can be vacuumed easily if spilled. Use a tray for cleaner play.
4. What if my moon sand is too dry?
Add 1–2 teaspoons of oil, then knead it in slowly. Keep testing until the consistency holds shape without crumbling too easily.
5. How do I color moon sand?
Mix powdered or gel food coloring into the oil before combining with flour. This creates even color distribution.
6. Can I make moon sand gluten-free?
Yes. Substitute all-purpose flour with gluten-free flour. Just ensure it has a similar texture and absorbency.
7. Is baby oil safe to use in moon sand?
Yes, but it’s not edible. If taste-safe versions are needed, opt for vegetable or coconut oil.
Conclusion
The moon sand recipe is more than a simple activity—it’s a gateway to creativity, calmness, and sensory learning. From toddlers to elementary kids, this tactile play supports development in a screen-free, imaginative way.
It takes just minutes to make, requires minimal cleanup, and stores well for future fun. Whether you’re a parent, teacher, or therapist, this DIY sensory recipe is a reliable tool in your play-based learning kit.